
Recent Posts From Recipes

Cheesy Roasted Baby Potatoes
Sep 3Posted in Bacon, Cooking, Featured Articles, Quick and Easy, Recipes, Side Dishes
I’m not sure there is anything better than carbs and...
Graham Coconut Caramel Cake
Jul 15Posted in Baking, Cake and Cupcakes, Featured Articles, Recipes
I have not made a cake for fun in a while. The problem with having a whole...
Tex-Mex Wedge Salad
Jun 9Posted in Appetizers and Dips, Bacon, Cooking, Featured Articles, Quick and Easy, Recipes, Salads, Tex-Mex
Do you like salad? Believe it or not, I really like a good salad. In Texas,...
Mango Chutney and Bacon Grilled Cheese
May 5Posted in Bacon, Cooking, Featured Articles, Quick and Easy, Recipes, Sandwiches
What is the fastest comfort food you can make? Aside from a bowl of ice...
Strawberry Orange Cream Puffs
Apr 15Posted in Baking, Featured Articles, Pastry, Pudding and Custard, Recipes
I love it when the trees get green, and the bluebonnets begin to bloom! It...
Cheesecake Stuffed Chocolate Chip Cookie Bars
Feb 27Posted in Baking, Brownies and Bars, Cookies, Featured Articles, Recipes
I just finished writing my 5th cookbook. It has nothing to do with the...
Kerrygold Open-Faced Breakfast Toasts
Jan 5Posted in Bacon, Breakfast, Cooking, Featured Articles, Quick and Easy, Recipes
I’m a sucker for a good breakfast. I love breakfast, and I also love...
Honey Roasted Peanut Chocolate Chip Cookies
Dec 22Posted in Baking, Cookies, Featured Articles, Recipes
It there anything better than a peanut butter cookie? I am not sure that...
About Me
 I'm Kelly Jaggers, food photographer, recipe developer, and author. My mission is to bring you exceptional recipes that are good for your taste buds but bad for your waistline!
 Recommended Reading
|
 |
|---|---|
|
 |

|
 |

|
 |

|
 |
Search & Subscribe
-
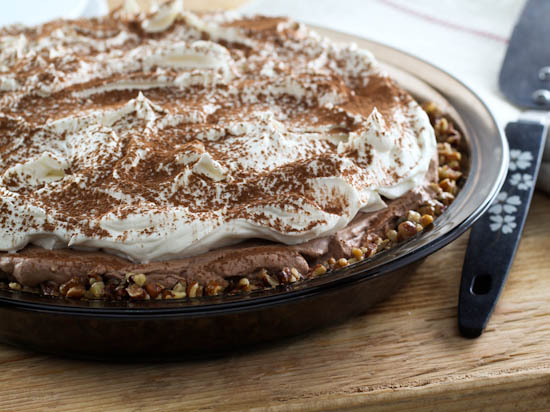
 No-Bake Mocha Cheesecake Pie Jul 13, 2017
 -
Cheesy Grits Cups with Bacon and Eggs Jun 21, 2016
-
Fudge Brownie Salted Caramel Cheesecake Pie May 18, 2016
-
Mac and Cheese Stuffed Meatballs Oct 20, 2015
-
 Taco Mac and a Rotel Giveaway! Nov 1, 2010
 -
-
Stove-top Macaroni and Cheese Mar 19, 2009
-
Salted Caramel Peach Crumble Pie Jun 22, 2012
-
 Chocolate Chip Brown Sugar Rolls May 16, 2013
 -
Taco Mac and a Rotel Giveaway! Nov 1, 2010
-
-
Cheddar and Gruyère Gougères Aug 3, 2009
Archives
- 2017 (1)
- 2016 (2)
- 2015 (8)
- 2014 (9)
- 2013 (21)
- 2012 (30)
- 2011 (57)
- 2010 (107)
- December (9)
- November (12)
- Cornbread Topped Turkey and Green Chile Casserole
- Gingerbread, Pumpkin, and Sticky Toffee Trifle
- Christmas Cookie Round-up – Part 2
- Turkey and Mushroom Soup
- Thanksgiving Recipe Round-up!
- Roasted Butternut Squash Casserole
- Chocolate, Coconut, and Red Curry Crème Caramel
- White Chocolate, Cranberry, Pecan, and Sweet Potato Cookies
- Cinnamon Crepes with Spiced Pumpkin Mousse and Graham Crumble
- Cheddar and Chive Beignets
- Sweet Potato, Apple and Caramelized Onion Gratin
- Taco Mac and a Rotel Giveaway!
- October (10)
- Black and White Gooey Butter Cake
- Food for the Road!
- Spiced Dark Chocolate Soufflé
- Sweet, Smoky, and Spicy Pizza on a Bock Beer Crust
- Bacon Dressed Green Beans
- Chocolate Sandwich Cookies
- Apple Fried Pies Made With Puff Pastry
- Sweet Potato Cupcakes with Brown Butter Cream Cheese Frosting (Just Desserts Challenge)
- Indian Dinner Party
- Carrot, Cardamom and Coconut Soup
- September (9)
- August (6)
- July (6)
- June (5)
- May (7)
- April (8)
- Baked Potato Salad
- Raspberry and Chocolate Ganache Cake with White Chocolate Buttercream
- Toasted Coconut and Chocolate Chip Blondies
- Zinfandel Braised Chicken Thighs with Mushrooms and Polenta
- 'Big Evil' Cheeseburger
- Blueberry Lime Fromage Blanc Tart
- Egg Salad
- Peanut Butter Cream Pie with Chocolate Whipped Cream
- March (10)
- February (10)
- Brown Sugar Chocolate Chip Scones
- Orange Almond Chocolate Cookies
- Sweet and Sour Chicken
- Black and White Cream Pie
- Evil Shenanigans in NYC ... Part 2
- Evil Shenanigans in NYC ... Part 1
- Cake-Off Voting Now Open!!
- Super Sunday Ideas!
- Sliders
- Chocolate Cream Filled Vanilla Bean Cupcakes with Vanilla Bean Frosting
- January (15)
- Jalapeno, Bacon and Cheddar Cornbread
- Chocolate Peanut Butter Brownies
- Creamy Chicken and Orzo Salad
- Southern Banana Pudding
- Oatmeal Peanut Butter Chocolate Chip Cookies
- Orange Chicken with Fried Rice
- Chocolate Swirl Pound Cake
- Pasta with Zinfandel Tomato Sauce and Ricotta
- Watch Out NYC! Evil Shenanigans is Comin'!
- Banana and Chocolate Mascarpone Crepes
- Slightly Less Evil Shenanigans - The 10 in 10 Challenge Week 2
- Mushroom Risotto
- Apple Carrot Maple Cakes with Maple Cream Cheese Frosting
- Pan Seared Polenta with Chicken and Tomato Sauce
- The 10 in 10 Challenge! Week 1 ...
- 2009 (129)
- December (14)
- Best of 2009!!
- Beef Empanadas
- Pancetta Risotto Cakes
- Merry Christmas!!!
- Pecan Tassies (aka Pecan Pie Cookies)
- Porchetta
- Seared Filet with Mushroom Cream Sauce and a Giveaway!
- Crab Cake Dip
- Peanut Butter Cinnamon Blondies with Peanut Butter Frosting
- Spiced Chocolate Crinkles
- Cranberry Chipotle Glazed Ham
- Fruit Cake
- Double Peanut Butter Chip Cookies
- Jalapeno Bacon Stuffed Mushrooms
- November (12)
- Coconut Oatmeal Cookies
- Christmas Cookie Round-Up!!
- Butter Croissants
- Tex-Mex Macaroni and Cheese
- Chocolate Chip Pecan Pie
- Slow-Cooker Braised Short Ribs with Honey Garlic Glaze
- Maple Thyme Chicken Legs
- Pumpkin Cupcakes
- Evil Shenanigans at FoodBuzz
- Tex-Mex Potato Cheese Soup
- Scenes from Munich 2009
- Grilled Eggplant Dip
- October (12)
- Fresh Pumpkin, Apple and Oat Muffins
- Four Cheese Potato Gratin
- Triple Citrus Skirt Steak
- Butterscotch Bread Pudding with Rum Sauce
- Pancetta Risotto Cakes and Some Exciting News
- Pasta with Gruyere and Butternut Squash
- Caramel Cake with Cinnamon Vanilla Bean Cream Cheese Frosting
- Roasted Butternut Squash, Sweet Potato and Maple Soup
- Bourbon Caramel Apple Pie Cookies
- Orange Cheesecake Cookies
- Creamy Parmesan, Mushroom and Chicken Pasta
- Chocolate Chip Coconut Brown Butter Cookies
- September (8)
- Chocolate Spice Cake With Brown Butter Frosting
- Crunchy Baked Chicken with Orzo in White Wine Sauce
- Baked Sopes with Skirt Steak and Black Beans
- Fresh Pasta - Mushroom Ricotta Ravioli
- Bolognese Sauce
- Apple Bacon Fritters with Maple Bourbon Glaze
- Mushroom, Bacon and Cheese Stuffed Chicken Breasts
- Peach Upside-down Cake
- August (5)
- July (11)
- June (12)
- Queso Blanco
- Bacon Wrapped Pork Loin Roast
- Five Spice Roasted Chicken Thighs with Peanut Rice Noodles
- Oatmeal Chocolate Chip Cookies
- Cinnamon Roll Bread
- Chocolate Loaf Cake with White Chocolate Glaze
- Pot Stickers with Pork Filling - Daring Cooks June 2009
- Grilled Mushroom and Ricotta Pizza on Sourdough Wheat Crust
- Baked Fish Tacos with Chipotle Dressing
- Banana Cake with Cream Cheese Frosting
- Lunch at Abacus with the Mushroom Council
- Soft Taco Stack
- May (15)
- FoodBuzz: 24, 24, 24 - Eating Local - Dallas, Texas
- Raspberry Chipotle Swirl Cupcakes
- Chipotle Gouda Cornbread
- Beef Enchiladas
- Bananas Foster Cream Pie
- Apple Blueberry Quick Bread
- Turkey Meatballs with Quick Tomato Cream Sauce
- Mocha Cheesecake
- Spiced Butter Poached Shrimp
- Onion, Apple, and Bacon Tart
- SugarBomber!!
- Baked Vanilla Custard with Nutmeg
- Slow-Cooker Chicken Tortilla Soup
- Pomegranate Glazed Skirt Steak
- Chocolate Chip Overload Cookies
- April (13)
- Wild Mushroom Agnolotti with Lemon Butter Sauce
- Apple Streusel Muffins
- Apple and Blueberry Crisp
- Chicken Tenders
- Almond and Chocolate Filled Butter Cookies
- Garlic Cheese Drop Biscuits
- French Fries
- Dark Chocolate Chip Brownies
- Jalapeno Popper Dip
- Maple and Bacon Muffins
- Garlic Butter Shrimp Pasta
- Dark Chocolate Mocha Cupcakes
- Toasted Coconut Pound Cake with Lime Curd
- March (14)
- Chicken Tikka Masala
- Spiced Dark Chocolate Pudding
- Bacon Cheddar Cheese Bread
- Chocolate Glazed Chocolate Tart
- Mango Avocado Salsa
- Stove-top Macaroni and Cheese
- Carrot Coconut Cupcakes
- White Chocolate Lime Cookies
- Aloo Paratha
- Char Siu Bao - Chinese Pork Steam Buns
- Chocolate Chip Cupcakes
- Lime Bars
- Curry Crusted Chicken Thighs
- Apple Rolls with Butterscotch Whiskey Sauce
- February (12)
- January (1)
- December (14)
- 2008 (28)
- December (6)
- November (5)
- July (1)
- February (4)
- January (12)
- Apple Tart!
- Wedding Cake and Mutant Meatloaf
- Tales of Puff Pastry and a Fish Fry
- How Evil are my Shenanigans?
- Playing in the Kitchen - Pork Chops
- A Long Night
- A Weekend at Home - Gougeres
- Surface to Mass Ratio
- New Classes Begin Today
- Cookbooks and Cakes
- So, I did something bad ... and other things.
- Happy New Year
- 2007 (17)
- 2006 (17)